
- Home
- Omeka & Neatline: Tutorial One
The Oxford Outremer Map
The Possibilities of Digital Restoration
Omeka Mapping Tutorials
Tobias Hrynick, Ph. D. Student, Fordham University
Contents
- About the Tutorials
- Tutorial One: Getting Familiar with Omeka
- Tutorial Two: Creating an Annotated Historical Map Using Omeka Neatline
- Conclusion
II. Tutorial One: Getting Familiar with Omeka
It is possible to set up a basic account off of Omeka’s own servers for free. These accounts are fairly sharply limited – they allow only a small selection of plugins and themes (which govern the functionality and appearance of Omeka websites) and only 500 mb of total space. While as a platform for setting up project websites, a free Omeka.net site is often insufficient, it is nevertheless a good way to get familiar with the Omeka platform. The following tutorial will walk you through a few basic features of Omeka, and help you decide whether this platform would be appropriate for your digital project.
1. Set up an Omeka Account
Go to https://www.omeka.net/signup, and select the “Free Basic Account,” option on the bottom left of the page. Enter account information, and Omeka will forward to your email address a link to continue setting up your account. Follow the prompts to set up your account, and a new website.
2. Choose a URL for Your Website
For free Omeka sites, you will be restricted to the format “….omeka.net.”
3. Access the Omeka Dashboard
Select “manage site,” to access the Omeka dashboard
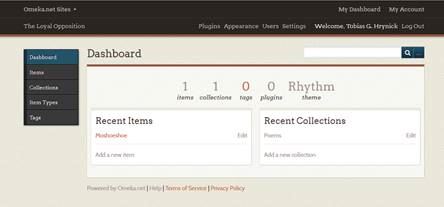
The dashboard is the screen from which you can edit Omeka-based websites. In general, the top navigation (“Plugins, Appearance, Users, Settings”) adjusts settings across the whole site, while the left-hand navigation (“Dashboard, Items, Collections, Item Types, Tags”) lets you adjust things which refer to a specific Omeka tool or modify specific elements of content.
4. The Top Navigation Bar
Click on each of the items along the top navigation bar in turn, and scroll down. The options available through the Omeka dashboard are limited enough that it is useful to scan through them all, since this is likely to save you time later, when you need to find particular functions.
- Plugins: Plugins are pre-fabricated pieces of code which allow you to use Omeka for more functions. The software for these plugins has to be placed on the same server which runs your site as a whole, and then installed through this “Plugins” tab. The server-space associated with your free Omeka.net account comes with a pre-set number of plugins (unfortunately not including Neatline) and does not allow you to add others. When you install these available plugins from this tab, new buttons will appear on the left-hand navigation, which will allow you to use the associated tools. Once you have installed plugins, you can also uninstall them from this tab.
- Appearance: This tab governs how your site looks, in ways broader than particular images or other “content,” elements. Like WordPress and many similar CMS’s, Omeka organizes broad changes of appearance into “themes.” Themes are managed much like plugins – they can be created and made available by individuals with coding experience, and must then be placed on the server from which you are running Omeka, at which point they can be put into use from the “Appearance” tab. Again like plugins, their use is quite restricted when you are using free Omeka.net server space. You do, however, have four themes from which you can choose (all pre-loaded onto the Omeka.net server-space), and some basic modifications which can be made within any given theme (using the blue “Configure Theme,” button). Feel free to click this now and see what your choices are for configuration– nothing will change unless you press the green “save changes,” button. Changing which of them you are using by clicking the “use this theme,” button will make the changes instantaneously, but feel free to do this too – it is easily reversible, and you can view how the appearance of your site changes by using the clicking on the name of your site beneath the “Omeka.net Sites,” button in the far upper left.
- Users. This tab allows you to make multiple user profiles with varying levels of privileges to make changes to your site. Because we have worked with a relatively small group of people who were more or less equally equipped to make site-wide changes, we never made more than a single user profile for the Oxford Outremer project – whether or not this constitutes absolute best practice is open to debate, and in any larger project, or in a class-room setting, this model would not be sustainable.
- Settings. The settings tab is the most miscellaneous of the tabs in its contents. You will also probably need to make changes with this tab least frequently. Nevertheless, it may be useful to examine its contents. “Item Type Updates,” and “Element Sets,” both allow you to adjust meta-date settings: meta-data is a structure which allows you to provide information about the kind of information contained in particular elements (much as a library catalogue card contains information about the information within a particular book) – Omeka’s standard meta-data structure is “Dublin Core,” about which you may find more information, along with descriptions of the function of metadata at http://dublincore.org/documents/dces/.
5. The Left-Hand Navigation Panel.
Browse through each item in the left-hand navigation panel. This panel is divided into the following sections:
- Dashboard. This allows you to access the Dashboard homepage, on which there will be links to items and collections which you have manipulated recently.
- Items. Items are the basic element around which most Omeka sites are organized. In origin, the items were intended to represent distinct archive items, in a range of possible formats. However, items are quite flexible, and it is possible to manage a wide variety of content using them. One might, for example, regard individual labels on a larger map as items.
- Collections. Collections are web-pages which display groups of items, in one of a number of pre-selected ways. Click “Add a Collection,” and browse the options – no changes will be made until you click another green “Add a Collection,” page which will appear to the right of meta-data options for a new collection.
- Item Types. This allows you to create new types of item for your site to display. In practice the range of options initially available is broad enough that this is rarely necessary to add new types, but you may find it useful to adjust how different types of item will be displayed. Click “Edit,” for a few item types (the option will appear orange text in the “Type Name,” column) and observe your options without clicking “Save Changes,” or “Delete,” unless you are already confident of the changes you will need to make.
- Tags. Tags allow you to cluster items by relevance to particular topics, by assigning key-words to them. Once you have made and tagged a few items, the different tags you have used will appear here, and you will be able to view groups of items based on your tagging system.
6. Make a Collection
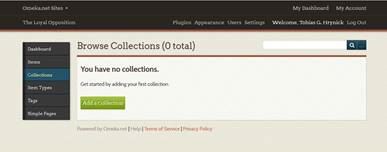
Click “Collections,” on the left-hand navigation panel, and then click the green “Add a Collection,” button.
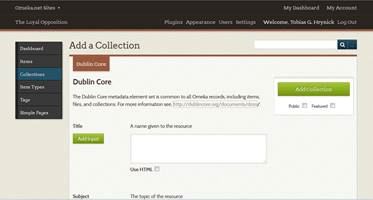
Omeka will prompt you to enter metadata using the Dublin Core. Enter some text. Feel free to enter nonsense text for the moment, just to try out the system. On the right there are two check-boxes, one marked “Public,” which will cause the new exhibit to be viewable by users online, and “Featured,” which will cause it to be displayed prominently on the home-page. Check both, and click the green “Add Collection,” button.
7. Create Items
Go to the “Items,” button on the left-hand navigation. Click on “Create a New Item.”
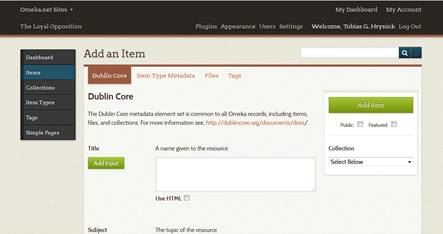
Across the top of the screen, you will see a series of tabs, labeled “Dublin Core,” “Item Type Metadata,” “Files,” and “Tags.”
- Dublin Core: a metadata structure which lets you provide information about the nature of the item you input in a structured and consistent way.
- Item Type Metadata: can be initially confusing, because both it and “Dublin Core,” refer to types of metadata. Item Type Metadata refers specifically to information indicating what kind of item you are using the item to display (text, image, video, etc.)
- Files: allows files to be uploaded from your computer to be associated with items
- Tags: allows you to associate key-words with items, by which items can be organized or searched.
For now, feel free to insert nonsense into the Dublin Core metadata fields, or else to try inserting information for an item which you might make in an eventual display.
Under “Item Type Metadata,” select “Text,” and note that a text-window appears for you to enter text, if you do not wish to upload it as a file. Enter some text here.
Under Tags, enter a few terms by which you might wish to search for your item later, separating them from one another with commas.
On the far right-hand side, notice the two check-boxes labeled “Public,” and “Featured,” – the function is the same as that of the similar boxes in the “Collections,” section. Check both. In the scroll-down list of collections below, select the name of your collection, and then click the green “Add Item,” button, above.
Repeat this process a few times, until you have a few items to work with, adding each item to your collection as you make them.
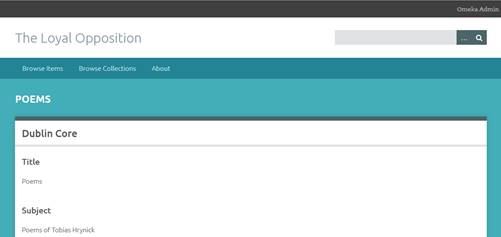
8. View Your New Collection
Click on Collections on the left-hand navigation, then click the title of your collection.
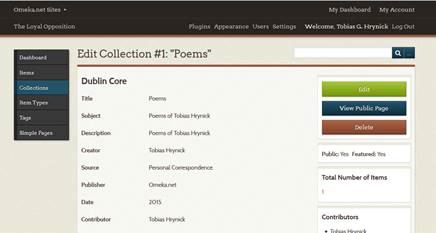
Click “View Public Page.” This will bring you to the collection, as it would be viewable by your site users. Note that depending on what changes you made earlier to your themes, the result may look quite different.
9. Moving Forward…
You now have done enough with the Omeka dashboard that you would be able to make a basic website, either by repeating steps you have done, or by extrapolating from what you have done in relatively simple ways. If you would like to cement your understanding of the Dashboard, and explore a few other possibilities, try completing the following:
- Add items to your current collection which contain pictures rather than text.
- Create a new Collection, which is not visible to the public.
- Install the “Simple Pages,” Plugin, and experiment with the new “Simple Pages,” option which will appear on the left-hand navigation (this is a good way to make simple web-pages containing only text or text and images, rather than Omeka items).
- Change your site’s visual theme, and view the public page to see the result.
If at any point you have difficulty with any of Omeka’s features, the two most reliable resources are http://omeka.org/codex/Documentation, and the very active forum http://omeka.org/forums/. You will undoubtedly have questions and run into problems, but the Omeka community as a whole is both welcoming and helpful, and the learning curve overall is quite shallow.
Continue to Tutorial Two: Creating an Annotated Historical Map Using Omeka Neatline >>